

How To Repair A Damaged Carrying Beam
How to Repair a Load-Bearing Mail service
Floor sagging? Hither'due south the solid cure for rotting posts and sinking footings.
![]() Time
Time
Multiple Days
![]() Complexity
Complexity
Intermediate
![]() Cost
Cost
$101–250
Introduction
Learn to identify the about common causes of floor sagging and what to do about it. Nosotros'll show you the all-time tools and methods for lifting and shoring a load-bearing axle and the steps to safely replace a rotted post.
Tools Required
Materials Required
- ½" dia. rebar
- 2 x ten weight-spreader boards
- 4000 PSI concrete (minimum)
- Anchor bolt
- Concrete plinth cake
- Heavy duty galvanized metal straps
- Heavy duty T-caryatid
- Joist hanger nails
- Sill sealer
- Forest post (4 x 4 or 6 x 6) for jacking
Sagging floors, doors that won't shut and cracks that appear in interior walls tin can exist symptomatic of a more serious problem. You may accept undersized support beams, support posts that are rotting and losing their structural integrity, or undersized mail footings that are settling. It's important to stop this problem and opposite it before it gets worse and becomes more costly to repair.
We'll prove you lot how to identify ii common causes of floor sagging, the all-time tools for lifting and shoring (temporarily supporting) a house axle, and the steps to safely replace a mail. The actual piece of work of repairing three to 4 posts and footings takes 3 or four working days spread over 10 days. Add to that the time to plan the work and obtain whatsoever required building permits.
Plus: Have you thought about removing a load-bearing wall in your home? Here'south what you need to know.
Raising the chief axle that carries the floors and interior walls of a house is complex. Don't tackle it if yous're a novice. When y'all enhance a house fifty-fifty 1/2 in., the furnishings tin can ripple through the building'southward framing, plaster walls, rigid pipe and chimneys. For this reason, only specialty contractors should raise a beam or wall more than nearly 1 in. or undertake extensive floor leveling.
Project step-by-pace (15)
Pace 1
Identify the Problem
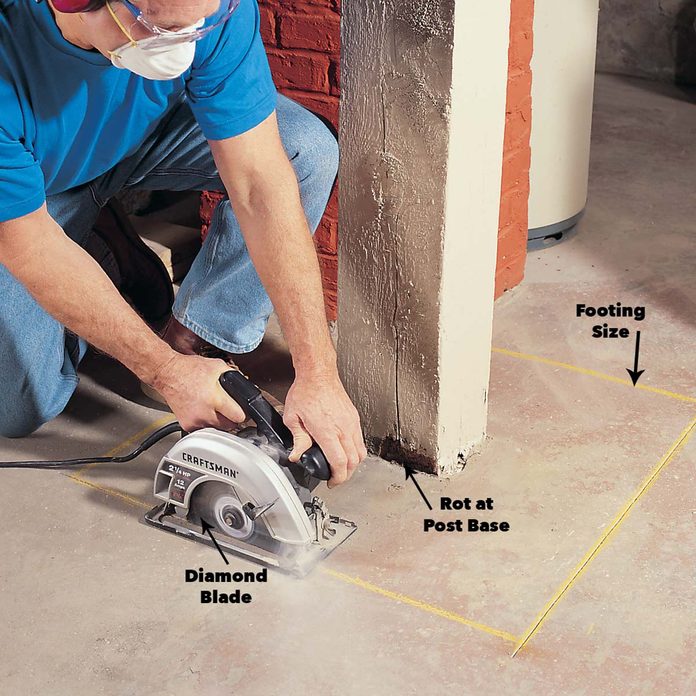
Floors sag considering the load bearing posts supporting a firm axle are failing and/or the footings holding those posts are undersized and sinking. Diagnose the problem past seeking the easiest solution first; go further just as needed. If your posts direct contact the floor, start past using a screwdriver to probe the base of your wood posts to reveal any rot that could have caused them to settle.
If the post isn't rotting, the physical ground it's on is almost certainly sinking or has deteriorated. Compare the old footing'due south dimensions with an engineer'south recommendations and current lawmaking requirements. To get at the footing, you'll take to saw through and strip off the concrete floor roofing it, then dig downward one side of the footing until you can measure its length, width and thickness. The seven-1/4 in. circular saw we used won't cutting through slabs more than 2-1/2 in. thick. For cutting through thicker slabs, hire a xiv-in. concrete saw fitted with a diamond blade. Hang plastic sheeting to block migrating dust.
To begin cutting out the old floor, mark the size of the new footing and cut the outline with a circular saw fitted with a diamond masonry blade. Kickoff by making a 1-in. deep plunge cut on each side of the post. Make successively deeper i-in. cuts until soil pulled from underneath the slab tells you the concrete has been breached.
Our floor sagging occurred because the post bottoms had rotted and the footings were undersized. Also pouring new footings and restoring the posts, we added plinth blocks to drag the wood above wet on the basement floor.
Step 2
Get Expert Communication

Posts and footings support the weight of your house, so yous have to size them right. Load-bearing posts must have a solid ground on undisturbed soil, and all parts of the post must exist fastened together. Consult with a structural engineer, local building officials and contractors who specialize in this work. Hire the professionals to review all aspects of your project and provide the calculations and drawings necessary to obtain a building let (Fig. A, shown higher up). Interview those who do residential work and have experience with this type of projection. Y'all tin can wait them to:
-
- Evaluate soil and its load-bearing chapters.
- Examine your business firm to identify possible problems from jacking it.
- Calculate proper footing, beam and load bearing mail service sizes.
Review your work plan. Evidence them the ceiling jack, shoring posts and spreader boards you intend to use to brand sure they're sized to elevator and safely hold your house beam.
![]()
Step 3
Separate Pipes From the Beam and Prepare for Lifting and Shoring

Release all rigid connections betwixt gas, heating, plumbing or electric lines (in conduit) and the business firm beam. To avoid rupturing these lines while the beam is being raised, support them with a 2x6.
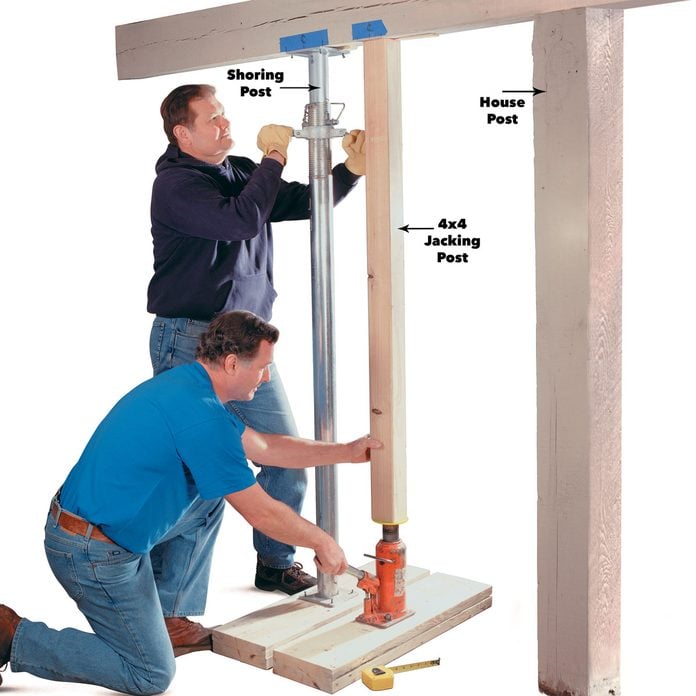
Repair or supervene upon posts or footings past raising the beam with a hydraulic jack and 4x4 post, so shoring information technology with adjustable steel posts. Purchase a hydraulic jack and rent the shoring posts for the projection. If y'all're removing and resetting more than than i basement post, utilise i hydraulic jack and move from station to station as you install and subsequently remove the shoring posts.
Every bit a house beam is raised, whatever rigid plumbing, gas, electrical or heating lines in the basement connected to the axle, the floors or walls above could rupture. Before jacking the beam, release the connectors holding these lines and support them with lumber resting on the basement floor. To monitor the total rise during lifting, measure and write the floor-to-beam heights on the axle where hydraulic jacks will be placed. And then remove or cut whatever nails, screws or straps that join the load bearing posts to the beam.
Step 4
Place the Hydraulic Jack

To avoid cracking the basement floor, lay two "weight-spreader" boards under hydraulic jacks and shoring posts. The boards should be two three-ft. long 2x10 boards a minimum of 6 in. from the sides of the hole. Place the boards flat and level to ensure a safe lifting base for the jacks and posts. Then center a hydraulic ceiling jack straight under the beam's lifting bespeak using a plumb bob. Make certain the jack is perfectly plumb and sits solidly level on the boards. If you accept a concrete flooring less than 2 in. thick, inquire the engineer if you should substitute thicker lumber to prevent floor bang-up. Check along the cut edge of the physical floor for voids that would collapse nether lifting pressure level. If you observe any, inquire the engineer for remedies to the problem.
Jacks apply tons of hydraulic force to lift the forest jacking post and beam, so select a virtually knot-free Douglas fir or Southern yellow pine four×4. Don't apply 2x4s or weaker woods like cedar or redwood. Apply a 6×6 if you're jacking houses with two or more stories.
Step five
Set up the Jacking Post

In one case the spreader boards are laid and the hydraulic jack is set in place, cut the 4×iv or 6x6 jacking post to fit betwixt the jack piston and the beam. Measure the height between the back up beam and the top of the jack'south lowered piston, so deduct 1/2 in. and cut the mail to length. Place a 1/4-in. thick steel plate between the piston and the lesser of the load begetting post to prevent the piston from condign embedded in the postal service. Snug the mail upwards to the beam by closing the jack'southward release valve and pumping the jack handle upward and down to heighten the piston.
Stride 6
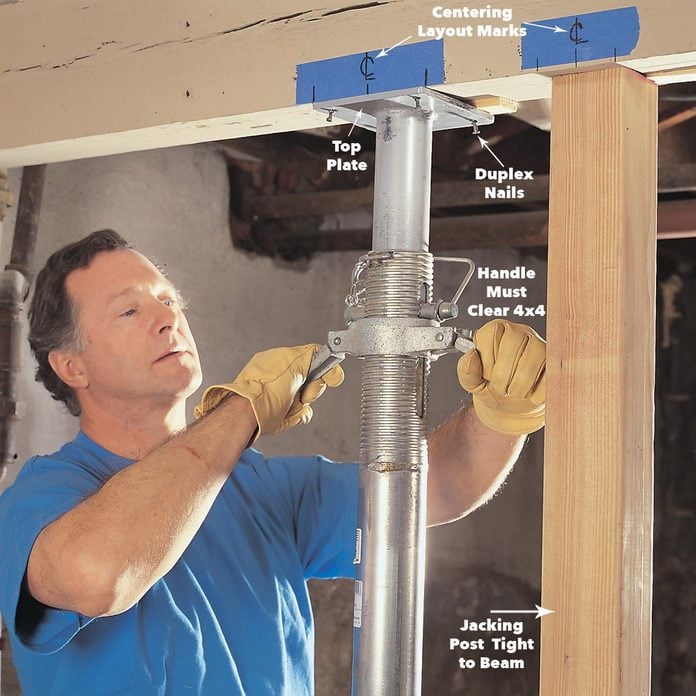
Center a shoring mail service on its spreader boards well-nigh 12 in. from the 4x4 jacking post. Then lower the postal service's screw head to its everyman position, raise the telescoping sections equally high as they'll become nether the beam and insert the metallic pins to lock the sections together. Heighten the screw head to its centered position under the beam and attach the top plate to the beam with duplex nails. Now you're ready to lift.
Step 7
Safely Lift the Beam
Enhance the business firm beam past pumping the hydraulic jack very slowly using short strokes. Heighten it no more 1/ii to i in. total to release the weight from each post. Measure from the floor to the beam to monitor the axle's rise. Have an assistant simultaneously raise the shoring post as tight every bit possible against the beam to provide backup load support. When the old post loosens, remove and label it for reuse.
I have never lifted a house beam without having the hairs stand on my neck as I pumped the jack and heard the axle, floors and walls to a higher place groaning in response. Before lifting, double-check your equipment, visualize your program and think condom. Follow these rules:
- Only employ shoring posts rated to carry your beam load. Rent whatsoever type exceeds the load specified past the structural engineer.
- As the hydraulic jack lifts the beam, plow the handle of the shoring post to keep the post head tight to the beam.
- But apply shoring posts to support a beam while work is underway. Never apply hydraulic jacks as shoring devices. Jacks may have defective internal seals that could leak hydraulic fluid and cause the jack to slip and drop the load.
- Raise the axle only until the mail is released. Once the load is released from the one-time postal service, have an assistant remove the post. Then label both its top cease and its location along the beam for exact repositioning subsequently.
Pace 8
Dig the Footing

If you have to supervene upon undersized footings, it's fourth dimension to excavate, place steel reinforcing rods and pour concrete for them. With the mail service removed, break out an undersized footing with a sledgehammer and shovel (wearable goggles and gloves) and pour the new 1.
Excavate the footing pigsty to the specified size, digging the sides and bottom of the hole foursquare and level. Scrape loose soil from the bottom of the hole until you reach the undisturbed soil. If the soil caves in along the edges, install 1/2-in. plywood to hold the dirt back. Remove them while pouring the physical. As shown above, during excavation, make a depth gauge to ensure a footing with uniform thickness and a level lesser.
Step 9
Place the Rebar

Install rust-complimentary, 1/2-in. dia. reinforcing rod (rebar) to strengthen the concrete footing. Buy two-ft. lengths of one/ii-in. rebar at home centers. Next, append the rebar in the lower tertiary of the footing and tie the rebar together using 16-gauge wire.
Footstep 10
Cascade the Footing
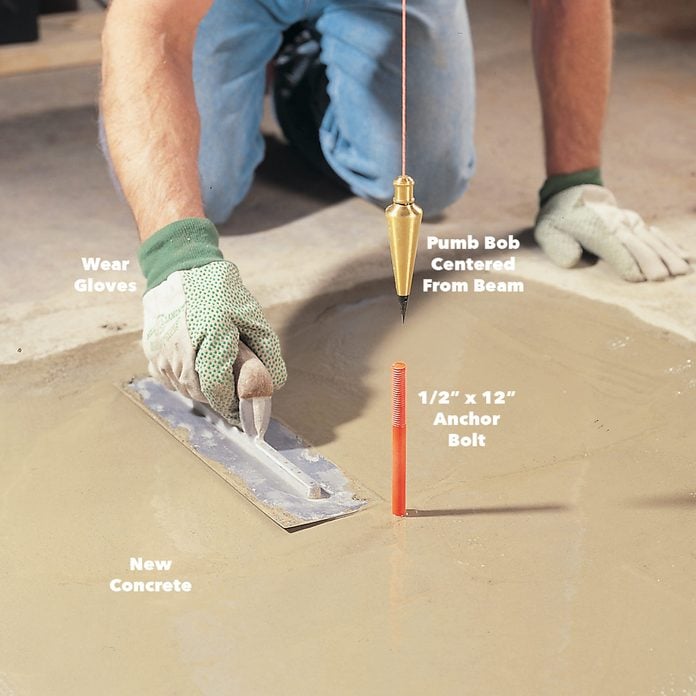
Pour physical into the hole to the level of the existing floor and shine it with a steel trowel. Select concrete with a minimum compressive force of 4,000 psi (check the packaging, or order information technology that way). For maximum forcefulness, add only the amount of h2o specified by the manufacturer. Also, be sure to mix and pour all the concrete for each ground in less than one hr so that the batches bond well. Finally, suspend a plumb bob from the post's center signal nether the axle in a higher place and place a 1/2-in. 10 12-in. anchor bolt in the moisture mud. Our ballast bolt rises half dozen inches out of the concrete.
Step xi
Place the Compression Block
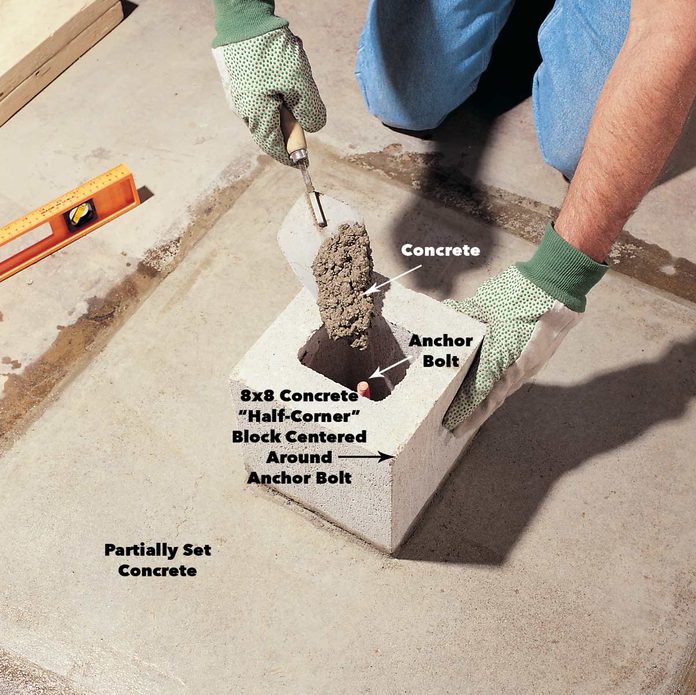
Level an 8x8 concrete block in freshly laid concrete, centering information technology effectually the ballast bolt. Completely fill up the core with concrete. Relieve time by setting the plinth block on a withal-wet footing in one case the concrete can support the weight of the block. To suit our 6x8 woods post, we used a standard 8x8 half-corner block. Brand sure your plinth is at least as large as your postal service.
Step 12
Reinstalling the posts

Install the post on a new plinth and footing only after the concrete has cured for seven days. Wood posts are easier to work with, and then stick with wood rather than metallic. Home centers and lumberyards behave steel "mono-posts" and steel posts with telescoping sections, only you need special skills and techniques to properly back up woods beams with steel posts. Consult with engineers and/or local building officials earlier using them.
Your local building officials may insist you install just new, pressure-treated 6x6 posts assail plinths. We had no such restrictions and reused our old wood posts because they were even so alpine plenty after sawing off the rot. If this is the case for you too, measure the acme between the house beam and the plinth, subtract three/xvi in. and cut the old basement post to length. Saw a squared bottom from the rotted cease, using a circular saw to girdle the post. End the cut with a handsaw.
Footstep xiii
Ready the Post
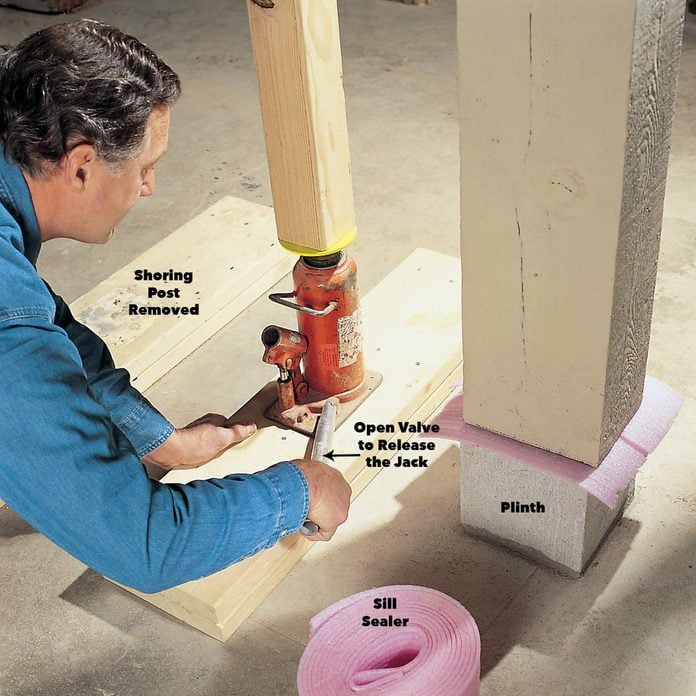
About old posts don't have a foursquare, level top. Don't change that. For the best contact and load transfer, reinstall the posts exactly in their original position nether the house beam, with all those old irregularities plumbing equipment like a manus in glove. To preclude any moisture from wicking into the mail service from the plinth, lay sill sealer or galvanized canvas metal between the two. Set the post on its plinth block, matching the mail acme to its prior contact position with the house axle. Then reset the hydraulic jack, lower the shoring postal service, and very slowly open the valve of the hydraulic jack to carefully lower the beam onto the post.
In your excitement to reset the posts and finish the task, don't take risks. Utilise an assistant and lower the ceiling jack very slowly, leaving the shoring in identify while putting weight onto the posts.
Step 14
Anchor the Post to the Plinth Block

Using a hammer drill fitted with a masonry bit, predrill two three/16-in. holes ane-1/4 in. deep into opposite sides of the plinth block. Install 1-1/4 in. concrete screws through metal anchor straps into the plinth then blast the straps to the wooden postal service with galvanized 10d box nails.
Step 15
Fasten the Beam and Mail Together
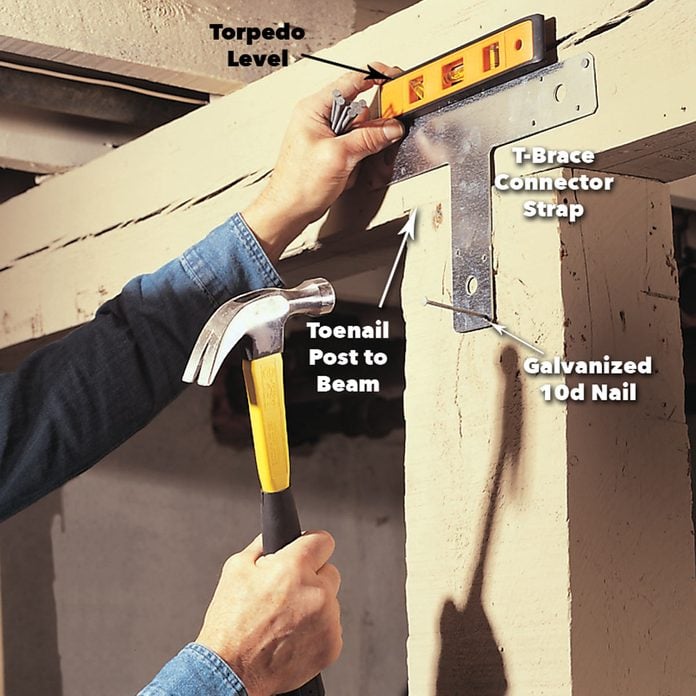
Join the support beam and wood load bearing post by toenailing them together and attaching two metal T-braces to opposite sides of the axle with galvanized 10d box nails. One time that'due south done and the support strapping is reinstalled on all gas, electric, plumbing and heating lines, you'll have the satisfaction of completing a job that will final for the life of the house.
Plus: Learn how to install a load-begetting beam here.
Originally Published: December 17, 2022
Source: https://www.familyhandyman.com/project/how-to-repair-a-load-bearing-post/
0 Response to "How To Repair A Damaged Carrying Beam"
Post a Comment